Author Archives: arvindk.86@gmail.com

Living Room Studio Setup

I’ve been working on a music project for the last few months, and in order to be generally efficient and maintain the consistency of the sound of the guitars across different recording sessions, I created a structured ‘pipeline’ for recording. Also this setup exists in my living room, which is in an apartment, so a classic analog setup with amplifiers and mics was out of the question, it would have been much too loud for my neighbors and much too cumbersome for myself. I opted for a solution involving a lot of digital mumbo jumbo. The following diagram shows the setup.

audioMap

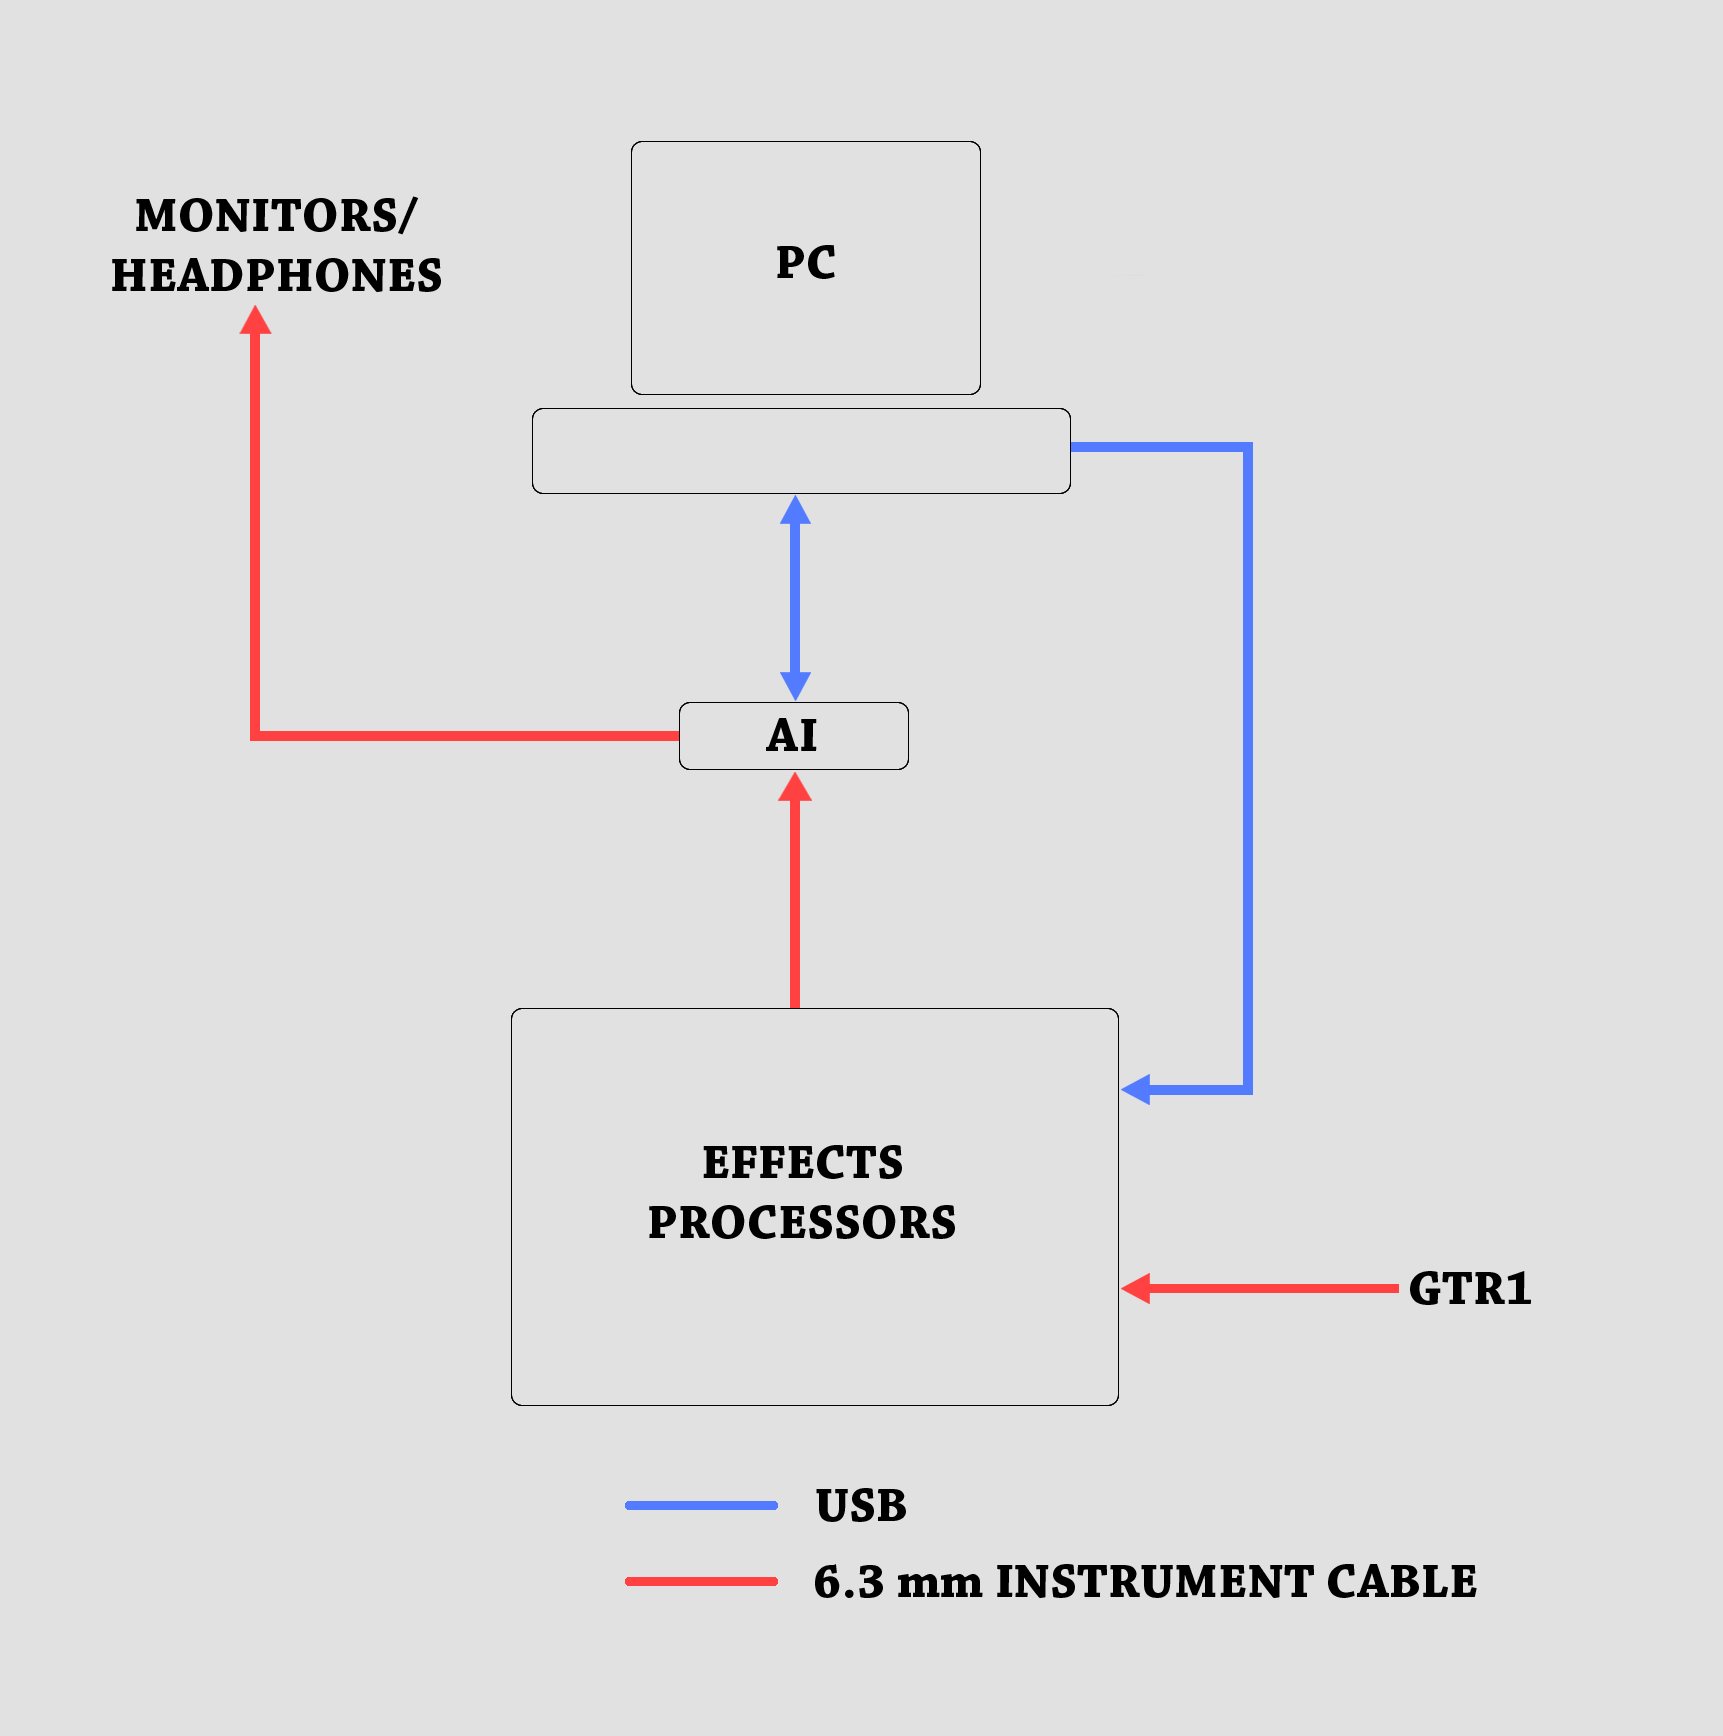
The analog guitar signal first goes through the chain of Effects Processors via an instrument cable.

The processed analog sound goes into the Audio Interface, which is the heart of the system. The AI lets me monitor the guitar signal by sending a direct analog output to speakers or headphones. Purists might cringe at this ‘amp-less’ setup at this stage, but I feel I get a pretty good sound by the final stage.

The AI is also connected to the workhorse – the PC, via a usb connection. The AI samples the analog signal and converts it into a digital signal before sending it to the PC. I use a Digital Audio Workstation(DAW) to read those signals and save them out in a project. The sound of the guitar is further moulded by the DAW with EQ, effects and plugins to get the final sound. The DAW also sends an out signal back to the AI for playback of recorded tracks, which allows me to record over sections that I have already recorded. There is also a USB connection into one of the modules in the effects chain, which allows me to control the module through my PC and help me save tone presets.

The project contains several different tones that need to sound the same every time I record. Every detail of the few tones used in the project is saved out in a document, which contains information about levels of knobs, effects presets, guitar string type, choice of picks etc.

So far the setup has been pretty reliable and has worked out well for everything I’ve recorded.

Deploying MaxScript Tools

Here’s a brief description of a simple setup I created for deployment and update of tools over SVN at my workplace. Prior to this, tools were inefficiently being shared as separate files on a case by case basis. I knew the setup would need to be quick and straightforward from the designers/artists’ perspective. I did not want the end user to spend a lot of time or effort with the tools installation/updates. Also, the most recent version of the tools needed to be accessible by all users across the network.

Tools Folder – The main task was creating an organized and scalable tools folder that contains all the maxscript files. The folder also contains an icon folder, which holds all the custom icons that were created for the tools. A generalHelperFuntions.ms was created in the folder, to contain scripts for the more commonly used functions shared across several tools. Finally, there was the macros.ms file, which contains macroscripts for every script added into the tools folder.

3ds Max setup – 3ds max can be asked to run scripts on startup from a particular folder. The Tools Folder was linked to 3ds max so that whenever 3ds max starts, all the functions contained in the scripts would be initialized (In hindsight, this could be further optimized by separating the base scripts to a different location, and only the macros would be run on startup. The macros themselves would contain the location of the base scripts which could be initialized lazily)

SVN – Once the tools folder was setup and tested with 3ds max, it was checked into SVN. Tools are added/updated and checked into SVN as and when needed. For adding a new script, macros.ms also needs an entry for it.

Client Side Setup – To install the tools for an end user, the Tools Folder would need to be checked out from the repo into the users local drive and 3ds Max would be directed to read scripts from that folder on startup. This is only a one time setup (unless 3ds Max forgets the path to the Tools Folder, in which case it will have to be done again) and is a fairly simple one too.

Client Side Update – Every time a tool is updated/added, the user can SVN update the Tools Folder and restart 3ds Max, and they would have the latest version of the tools up and running.


Managing Interactive Game Props

An interactive prop in a game would be any animatable object in the game world that a character interacts with. As an example, to implement a player turning a valve, the player must be positioned at the right place with respect to the valve. Both interaction animations (prop – ‘valve turning’ the player – ‘turning valve’) must be played in sync with each other. What programming needs to implement this:

  •  Some sort of locator node in the prop rig to determine the position of the player with respect to the valve. On pressing the ‘interact’ key somewhere close to the prop, the player will be interpolated to the correct position.
  • The player animation and valve animation, both should be exactly the same in length. These can be played when the player is at the correct position.

The last time we used interactive props, the animators were setting this up manually. The process would involve importing the prop rig (exposing potential naming conflicts) and manually placing the tag in the prop rig at the correct position. Once the prop and character have been animated, they would need to saved out into separate files. This is a very time consuming and error prone process. The ‘Interactive Prop Manager’ tool was created to automate all this for animators. On the surface, the tool allows the animators to import a a prop into an animation file and work on the character and prop in the same scene in Max. In our example, the valve rig can be imported into the player rig scene and the animator can animate the interaction.

propMgr

Step 1: Import prop – opens a file browser window to select a file. On import, the prop is placed in the scene using the character reference tag present in the prop file. This step also renames all the nodes in the prop file with a prefix to separate it from the character rig nodes for easy identification.

Step 2: Animate – Animator animates the character and rig.

Step 3: Export Prop – saves out the prop file as its own separate animation. The thing to consider here is that in the prop file, the prop is at the center of the scene, while in the character file, the prop would be offset due to the interaction. This offset is calculated using a non keyable prop root control curve. The prop root control curve will always stay in the center of the prop rig and can be used by the animator to place the prop within the the character rig file. The offset between the player reference tag and the prop root control curve will be the amount the prop scene would need to be moved in the prop rig after export. This offset will also move the player reference tag to the correct position.

prop_rig

the prop rig file

player_rig

the player rig file, with the prop imported and offset based on ‘player reference tag’

Smooth IK setup


smoothingAlgs

IK smoothing is used to soften the motion of the IK handle as the chain approaches full stretch. It can be set up in the 3ds Max by position constraining the IK handle to two targets with distributed weights. One target should be the IK control curve(CC in gif) and the other, an object placed at the position of the first bone in the IK(FB in gif) chain. The position weights need to be set as script controllers. Given the nodes CC and FB, we can calculate smoothing using the following script for the influence of CC –

Exponential Smoothing:
            x = (distance CC FB) – Rmin
            y = x
            if x > 0 do
            (
                        y = (D – Rmin)*(1-exp(-x/(D – Rmin)))
            )
            r = (Rmin + y)/(Rmin + x)

Trigonometric Smoothing:
            x = (distance CC FB) – Rmin
            L = Rmax – Rmin
            y = x
            if x > 0 and x < L do
            (
                        y = (D – Rmin)*sin(90*x/L)
            )
            r = (Rmin + y)/(Rmin + x)

Rmin is the minimum radius of influence beyond which smoothing starts to take action. Rmax, used only for the trigonometric method and it defines the maximum distance CC needs to be from FB for the arm to be completely stretched out. These values are shown in the figure as the blue curved lines (which are actually circles with the center at FB)

The weight influence of FB can be set as 1 – Influence of CC.

I personally prefer the trigonometric method because it contains the extra Rmin attribute, giving the user more control. Also, it has a more natural motion as CC approaches Rmax.

Input.GetAxis vs Input.GetAxisRaw

I recently started getting into some Unity programming with C# and was working on a character controller script to make a simple box move on a 2D plane. I was using the Input.GetAxis method to read the input from the keyboard. After a little bit of playing around, I wasn’t satisfied at all with the way the character was moving, it seemed like there was a little bit of delay when the key was pressed and also when I let go of a direction key, the character still moved a little bit as if it had some momentum. None of the physics settings seemed to fix this issue. After a bit of digging around, I found out that it was not the physics that was causing the sluggishness and over shooting, it was the input method. The Input.GetAxis method contains an inbuilt smoothing filter which automatically smooths out the key press. This means that the function won’t give an immediate full response to the key press, the return value will gradually increase from 0 to 1 as the key is pressed and decrease from 1 to 0 as the key is let go. I personally find this smoothing quite annoying and it feels sluggish for the kind of movement I want. The alternative is to use the Input.GetAxisRaw which gives a 1 when the key is pressed and a 0 when it is not. Simple and straight up.